
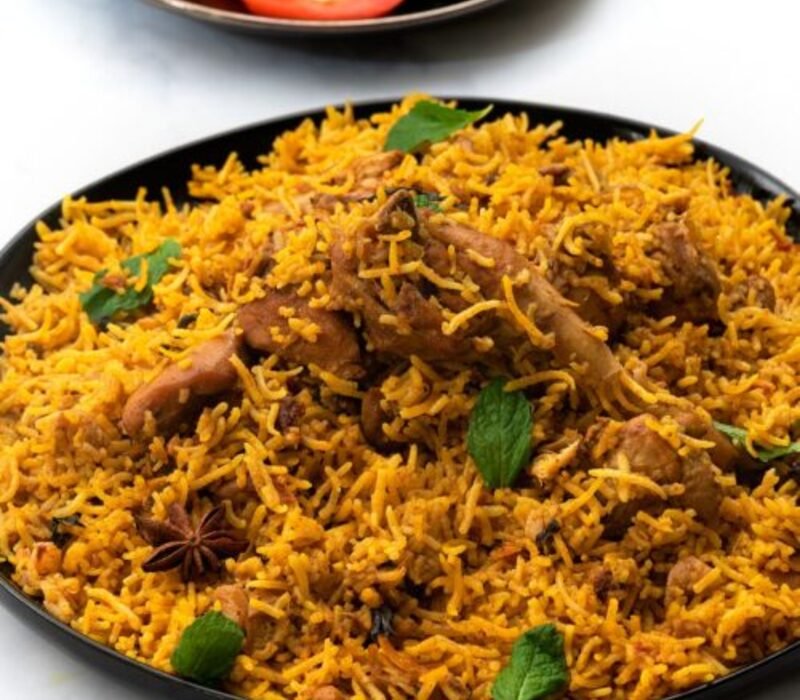
Observe! A bona fide Gongura chicken biryani recipe with basic, simple to adhere to directions (no curves!) and heavenly, customary Pakistani and Indian flavor. This recipe remembers tips for how to get cushy rice, delicate chicken, and the unmistakable biryani taste. Tried flawlessly!
It required me positively no work to present to you this biryani recipe. All I needed to do was track down the best biryani in Houston, analyze it, perform 10+ preliminaries, utilize the ideas in Salt Corrosive Fat Intensity to additional ideal it, review my email list for inclinations, add to sort out zest amounts, and you know, cry a bit.
To put it plainly, I in a real sense ate, rested, and inhaled biryani until I could gladly distribute this most darling, profoundly mentioned recipe and do it equity. Golly. Let’s get it done.
Page Contents
What is Gongura Chicken Biryani?
Biryani is a perplexing rice dish made with layers of curried meat and rice. Given its utilization of decorations and rich gets done, it’s nothing unexpected that biryani has been established in Persian cooking.
There are two primary techniques for making Gongura chicken biryani:
Kachi (crude) biryani, made with crude meat and parboiled rice and cooked together, and
Pakki (cooked) biryani, in which cooked meat and parboiled rice are steamed together.
In Pakistan, (or cooked) biryani is generally normal, with a few unmistakable assortments, for example, Sindhi, Karachi-style, and Bombay biryani. This recipe is a mixture of these styles and like you’d find at a common Pakistani or Indian eatery or evening gathering.
Elements For Gongura Chicken Biryani
I’ve purposefully picked the fixings and amounts to giving this biryani solid groundwork. All things considered, this recipe can take a lot of replacements and variations despite everything being brilliant.
Oil/Ghee: I’ve involved oil for ease and ghee for taste.
Onions: You can either daintily cut them (more conventional) or finely hack them. Assuming utilizing a food processor to do this, heartbeat to hack so it doesn’t mix into the glue.
Bone-in, cut-up, skinless chicken: I purchase pre-cut-up bits of an entire chicken, however, bone-in chicken thighs work as well. You can likewise utilize boneless chicken, however, it might require a more limited cooking time.
Entire flavors: A liberal measure of entire flavors are an unmistakable trait of biryani. Entire flavors are intended to be disposed of while eating, however, to chomp into them, feel free to spot them in a zest/muslin sack.
Garlic + Ginger: I’ve given their amounts in entire structure and tablespoons. I utilize a mortar and pestle or a food processor to pulverize them.
Tomatoes: Since biryani has heaps of harsh fixings like low carb greek yogurt, dried plums (Alu Bukhara), and lemon, I’ve tracked down downplaying the tomatoes gives it a perfect proportion of tang.
Yogurt: Besides the fact that yogurt marinades make the chicken more delicate and delightful, it likewise makes cooking the biryani much smoother. For a sans-dairy choice, take a stab at utilizing coconut milk.
Rice: I propose utilizing matured, long-grain basmati rice you can find at some supermarkets, any Indian/Pakistani specialty store, or on the web.
Dried Plums (Alu Bukhara): I generally treasure the aiding of biryani with these sweet astonishments. Alu Bukhara is many times utilized in biryani to give a sweet, tart taste. They’re normally accessible at South Asian supermarkets, however, in the event that you can’t find them, you can either substitute with dried prunes or overlook them.
The Most Effective Method to Make Gongura Chicken Biryani – 3 Fundamental Stages
I accept this recipe is really simple – no unnecessary or monotonous advances that don’t add to the large flavor. You’ll find that while it requires investment, a large portion of it is latent cooking time. Also, the final product is very fulfilling and amazing. These are 3 sections to making chicken biryani:
Stage 1: Set up the chicken curry.
Set up the biryani masala (or use locally acquired) and marinate the chicken.
Cook the chicken curry. While it’s cooking over low intensity, set up the rice.
Stage 2: Parboil the rice.
Heat a pot of water to the point of boiling and parboil the rice. Channel and put away.
Stage 3: Unite everything for the last steam (‘dum’).
Layer half of the rice, all of the chicken, and afterward the excess rice on top. Add the last few details.
Permit steam to grow, then bring down the intensity and let the flavors merge.
Biryani Masala
Gongura chicken biryani is weighty on zest (and flavor!) and is frequently made with biryani masala, or basically, a mixture of flavors that meet up to give it a particular, (or flavor-loaded) taste.
I suggest you utilize the biryani masala recipe underneath (all you really want is a decent flavor processor and a couple of additional entire flavors). On the off chance that you’d don’t really want to, you can substitute your number one locally acquired biryani masala. This recipe has been tried and works perfectly with Bombay Biryani Masala.
To make Biryani masala for this recipe, consolidate the accompanying fixings in a flavor processor and cycle until for the most part smooth. Makes ~2 tbsp, which is the specific amount you’ll require for this recipe.
| 1 medium dried narrow leaf | |
| 2 dried button red bean stew peppers | |
| 1 little entire mace | |
| 1 2-inch cinnamon stick | |
| 4-5 entire cloves | |
| 1 dark cardamom | |
| 1-star anise | |
| 3-4 green cardamom units | |
| 1 tsp broiled cumin seeds or dark cumin seeds | |
| 1/2 tsp dark peppercorns | |
| 1/4 tsp fennel | |
| 1/4 tsp carom seeds |
Step-by-Step Instructions to Make The Chicken Delicate and Tasty

There are 3 parts that make the chicken delicate and profoundly enhanced:
Marinate the chicken in flavors and yogurt. This injects the chicken with observable flavor. Preferably, marinate for the time being or for two or three hours, however, I tried and saw that as it’s still extremely delectable on the off chance that you marinate not long prior to making the biryani.
Remove the chicken from the cooler before you begin setting up the biryani. Permitting the chicken to draw nearer to room temperature helps it cook all the more uniformly and remain delicate.
In conclusion, the wake of sautéing the chicken in the hot oil, add water and permit the chicken to stew tenderly, covered, and over low intensity.
The Most Effective Method to Parboil The Rice to Guarantee Cushy Rice in Biryani
Recognizing doneness can be confounding, so I’ve worked on it by giving time boundaries to remove the mystery from bubbling.
Assuming you’re utilizing the suggested matured, long-grain basmati rice, you’ll have to bubble for 5 minutes. On the off chance that you’re utilizing recently collected basmati rice frequently found in American supermarkets, it’ll require a more limited bubbling time (close to 4 minutes).
At 3 minutes, the rice actually has a crude community.
At 4 minutes, the middle has for the most part cooked, yet the rice piece is as yet extreme.
After about 5 minutes, the rice begins to grow and the rice is simply cooked. In the middle of between 5 minutes and 5:30 seconds is the point at which halting heating up the rice is great.
At 6 minutes, the rice is cooked, yet begins to break effectively without getting soft.
In the middle of between 7-8 minutes, the rice gets soft once squeezed between your fingers. This is an indication that it’s overcooked and is bound to break during the ‘dum’ stage.
Here Are How to Fix Overcooked or Half-Cooked Rice
Assuming you overcook your rice:
-Lay the equitable bubbled rice on a level plate following bubbling to guarantee it doesn’t bunch together.
-Steam (dum) for a more limited time frame to keep away from breakage.
On the off chance that you half-cook your rice:
-Sprinkle ¼ cup of water on top of the rice during the steam.
-While covering the pot for steaming, utilize a clammy kitchen material rather than dry to give additional dampness.
More Tips to Stay Away From Soft Rice
While the last chicken curry will have an extensive measure of curry or ‘wet masala’, it ought not to be watery. As the recipe proposes, sauté out an abundance of dampness toward the end and guarantee that the oil has isolated from the curry.
When the steam (dum) stage is finished, don’t mix. Utilize a rice oar or a little plastic plate to scoop it onto the serving platter.
Ensure you utilize the right sort of rice. Matured, long-grain basmati rice is normally fluffier and ideal for biryani. Another great choice is Sella Basmati rice, which is steamed while still in its husk. This assortment is sturdier and can endure a touch of overboiling better compared to conventional basmati.
A touch of corrosive from lemon or vinegar is said to keep the rice from staying together.
Step-by-Step Instructions to Get The True Kind of Gongura Chicken Biryani

A whopping 52% of my email local area viewed getting the taste right as the most troublesome aspect of making biryani. I’ve viewed this as:
A critical part of getting the true flavor is to utilize considerably more zest (entire and ground) than what you would for a common curry. The chicken marinade and curry ought to have serious flavor, generally, it’s probably going to relax when joined with the rice.
Driving into this, there ought to be a lot of curries or ‘wet masala’ to the chicken.
Ultimately, steaming (‘dum’) is critical in the flavors that give it the particular biryani taste and smell.
What Pot to Use For Steaming?
However, you can utilize any pot or skillet you might want to set up the chicken and parboil the rice, a Dutch broiler or profound pot (no less than 5 qt) will be useful for the steaming (‘dum’) stage.
Except if you’re making bigger amounts, don’t stress over purchasing an extraordinary pot for biryani. I’ve had a go at utilizing a modest dutch stove with a Tava under and a cast iron dutch broiler and both functioned admirably. The following are a couple of tips:
Weighty lined or cast iron dutch stoves take more time to foster steam, however, they are better at keeping the rice from adhering to the pot.
On the off chance that your pot isn’t weighty lined, utilize an intensity diffuser, level iron, or under it to keep the rice from adhering to the base.
Utilize a Dutch broiler or pot with straight edges. The objective during the steaming stage is to keep the steam inside, and profound, straight-edged pots are better at holding steam.
The Most Effective Method to Twofold This Recipe
I’ve tried this recipe a few times with twofold the amount. Here’s what’ll change:
Increment sauté times.
Utilize bigger dishes, particularly for steaming.
While adding water to cook the chicken (Stage 4), rather than multiplying and adding 1 full cup, decrease to 3/4 cup of water. The water ought to cover around 1/3 of the chicken. This makes it more straightforward to sauté out the water subsequent to cooking the chicken.
Utilizing saffron and ghee are the two most effective ways to carry that ideal smell and flavor to your Biryani. At the hour of gathering Biryani, top the dish with saffron-absorbed milk to give it a brilliant variety and pour ghee to raise the flavor.
Biryani is famous in view of Its rich flavor. It is a good dinner that one can appreciate at any hour of the day or night. It is interesting to each sense of taste and age bunch.